Rough Puff Pastry
Nuts and Bolts:
Rough Puff Pastry uses a complicated baking technique, but it is one of the best techniques you can have in your repertoire. This recipe is adapted from The Flavor Blender Blog. I have tried other recipes of rough puff pastry, and this one is the best. It produces a lot of puffed pastry (about 1½ pounds). So, break out your rolling pin and give it a spin in your mess.
Thoughts on Rough Puff Pastry:
The taste of homemade puff pastry has a more intense buttery flavor than store-bought pastry.
This rough puff recipe is more forgiving than the others I have tried.
This recipe only works in metric measurements, so do not be afraid of it if you have never measured in metric.
Temperature control of dough and ingredients are essential. You want everything as cool as possible.
I leave a couple of packages of butter in my freezer so that I can make puff pastry on a whim.
Method:
An important tip Before You Begin: If you plan to make puff pastry, place your butter in the freezer at least a day before grating it. Frozen butter grates better and easier than butter, just cold out of the fridge.
Day one:
This recipe is all about organization and temperature control to make this dough successfully. You will need 60g of unsalted butter grated, 200g of unsalted butter; grated divided in half, and 350g of all-purpose flour.

Weighing out the flour.
Important tip: This recipe is designed and only works if you weigh the butter after it is grated.
First, grate the butter using either a box grater or a food processor. I like to use a food processor because there is a lot of butter to grate. Either fine or coarse grate works for the butter.
Important tip: Organization is key to this recipe. So, I place my butter and flour in marked bags in the freezer. If I make multiple batches, I keep the flour and butter separate for each respective recipe.
Once I have grated a package and a half of butter. I start weighing it out. I use sandwich bags that are marked. First, I weigh out 60g of butter, place it in a bag marked 60g, and put it in the freezer.
Mess factor: You do not need to use plastic bags; any freeze-safe container that you have will work here. It just helps with organization and your overall success.
Next, I weigh out 100g of grated butter and place it in a bag marked 100g. Repeat with the other 100g of grated butter. Place both bags in the freezer. Then weigh out the flour and place it in a bag, and put it in the freezer as well.

Finely grated butter in the food processor.
Day Two:
The rest of the ingredients are ¾ cup or 150 ml of iced water, 1 tsp of salt, and ½ teaspoon of white vinegar or lemon juice. You will want to make your iced water before you start this recipe.
Important tip: I never prepare the exact amount of ice water needed for a recipe. I usually prepare a cup to a cup and a half of iced water. I use a 1:1 ratio of water to ice, so I have really cold water.
To get started, get the flour out of the freezer, and put it in a bowl. Then add the one teaspoon of salt to the flour and mix until evenly distributed. After that, empty the 60g bag of butter into the bowl. And quickly integrate with your finger or knife to break up butter clumps and cover the butter with flour. Next, add your teaspoon of either lemon juice or vinegar to the flour mixture.
Important tip: A little bit of acid is vital to this dough, so do not leave it out. You will not taste it in the dough, so any vinegar or lemon juice will do. I have used white vinegar, and I have also used lemon juice; both worked well in the recipe.
Next, add the water about a tablespoon at a time. This recipe uses about 120-150 ml or about ¼-½ cup of water. You want the dough to hold together but not be too wet. If the dough gets too wet, it will be tough once baked. Also, you do not want the dough to be sticky or tacky. You want a soft but crumbly dough. The dough should want to stick together, but It may not come to a ball. Then dump on a lightly floured surface and knead the dough for a minute or until it becomes a smooth dough. After that, I like to form it into a small rectangle and then place it in the fridge for 5 minutes. While the dough rests in the fridge, prepare a lightly floured surface to begin the lamination of the dough.
Important tip: Be light with the flour; it needs to keep the dough from sticking to the counter or the rolling pin. But do not add too much because you do not want to incorporate more flour into the dough. You may even need to brush off the excess from time to time.

Making the dough: Top left, adding butter to the flour. Top Right, the butter mixed into the flour mixture. Bottom Left, adding ice water to the flour and butter mixture. The bottom middle, dough is ready to be kneaded. The bottom right dough is ready to be put into the fridge.
Introduction to Lamination:
The method of laminating a dough involves folding the dough to incorporate the butter into it. The layers are created with each fold of the dough. The process creates the layers by alternating dough and butter in the pastry. As it is baking, the liquid in the butter evaporates to create the flaky layers in the pastry. A solid butter layer is rolled into the dough in a traditional puff pastry. In the rough puff pastry, the butter is grated, so it incorporates easily into the dough. So if you are ready to laminate, can I get a "Hell Yeah, I Can Do This!" If some butter spills out of the dough. That's OK; it will work and taste delicious.
After five minutes in the refrigerator, it is time to begin rolling the dough out and making the first of 5 folds.
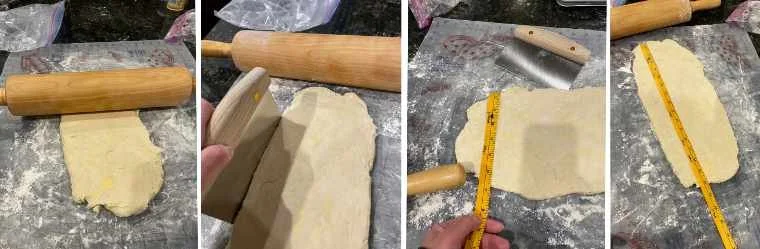
Rolling out dough for a fold: Left, rolling out the dough into a long rectangle. Middle left: Squaring off the edges. Right middle, measuring the width, from the widest part of the dough. Right, measuring the length.
The Folds:
1st fold: So, start by rolling out your rectangle dough into a rectangle that is 6-7 inches wide and 15- 16 inches long. When rolling out the dough, try to keep it in a rectangle shape and keep the thickness even. I use a dough knife to push the ends into sides to make them more rectangular. Then I keep rolling out the dough from the thickest end out to the thinner end to keep the thickness of the dough even. Once it is rolled out, mentally, measure out the thirds of the dough vertically. Then get one of the 100g bags out of the freezer and spread it evenly on the bottom ⅔. Try to cover as much of the dough as possible with the butter. Also, break up any chunks of butter before placing it on the dough. The next part is the folding of the dough. This can be tricky. Take the ⅓ with no butter and fold it over onto the middle of the dough. Then fold the bottom with the butter over the middle of the dough, covering the last fold. So, it forms a small rectangle. That is your first fold.

Folding to add the butter: Left, the rolled-out dough next to the butter in its bag. The Left Middle, the rolled-out dough with the butter covering 2/3 of it. The Middle Right, the top of the dough is folded over the butter that is in the center of the dough. Right, the bottom of the dough with the butter is folded over the middle to create the small rectangular dough.
Important tip: Temperature is key to making puff pastry, so if the butter starts getting warm and starts pushing through the dough, then put it in the freezer for 10 minutes. In the winter, I get through three folds before putting it in the freezer. In summer it could be two folds.
2nd fold: Turn the dough 90 degrees. Then roll out the dough again to the same size as before in a rectangular shape. Then spread the last 100g of butter onto ⅔ of the dough. After that, fold the dough without butter over to the middle, followed by the one with butter just as you did with the first fold.
3rd Fold: This fold is the first with no more added butter. So, turn the dough 90 degrees and roll the dough out to the same rectangle shape and size. After that, fold the top ⅓ of the dough to the middle. Then the bottom1/3 to the middle. At this point, I put it in the freezer for ten minutes to cold down.

Folding without the butter: Left, the dough is turned 90 degrees after folding with butter. Middle Left, the dough is rolled out. Middle Right, the top of dough folded into the center. Right, the bottom 1/3 of the dough is folded over the center of the dough and is ready to be turned.
4th fold: Turn the dough 90 degrees and roll the dough out to the same rectangle shape and size. Then fold the top ⅓ of the dough to the middle and then fold the bottom 1/3 to the middle. Put the dough in the freezer if the butter is too soft and comes through the dough.
5th fold: Turn the dough 90 degrees and roll the dough out to the same rectangle shape 6-7 by 15-16. Then fold the top ⅓ of the dough to the middle and then fold the bottom 1/3 to the middle.
After the fifth fold, wrap the dough in plastic wrap and place it in the fridge for at least 2 hours or overnight. For best results, I leave it in the refrigerator overnight. If you do not want to use it quickly, cut it in half and place it in the freezer.
To use: If you want, you can use it right after taking it from the fridge. But I like to give it another fold and before using it.
To use if frozen: Take it out of the freezer and let it rest until it is soft enough to roll out. Then roll it out and use it.
Final Thoughts of Rough Puff Pastry:
Once you make this recipe a couple of times, there will be no need to get store-bought puff pastry. This recipe is excellent for learning how to make laminated doughs. So, I hope you give it a go in your mess.

Rough Puff Pastry
Ingredients
- 60 g of unsalted butter grated and frozen
- 200 g of unsalted butter grated and frozen, weigh the butter after grating it (Divided)
- 350 g of all-purpose flour that has been in the freezer for a couple of hours
- 120 - 150 mL of ice-cold water (About ½ cup)
- 1 tsp of salt
- 1/2 tsp of lemon/lime juice (or white vinegar)
Instructions
- First, grate the butter using either a box grater or a food processor. Either fine or coarse grate works for the butter. It is recommended to grate a package and a half of butter before weighing out the butter into individual bags. First, weigh out 60g of butter, put it into a bag marked 60g, and put it in the freezer.
- Repeat with the other 100g of grated butter. Place both bags in the freezer.
- After that, weigh out the flour and place it in a bag, and put it in the freezer as well.
- You will want to make your iced water before starting this recipe.
- To get started, get the flour out of the freezer, and empty it into a bowl.
- Then add one teaspoon of salt to the flour and mix until the salt is evenly distributed.
- After that, empty the 60g bag of butter into the bowl. And quickly mix with your finger or knife in order to break up butter clumps and cover the butter with flour.
- Next, add your teaspoon of either lemon juice or vinegar to the flour mixture.
- After that, add the water about a tablespoon at a time. This recipe uses about 120-150 ml or about a ¼-½ cup of water. You want the dough to hold together but not be too wet. If the dough gets too wet, it will be tough once baked. Also, you do not want the dough to be sticky or tacky. You want a soft but crumbly dough. The dough should want to stick together, but it should not come to a ball.
- Then dump it on a lightly floured surface and knead the dough for a minute or until it becomes a smooth dough
- . After that, form it into a small rectangle and let it rest in the fridge for 5 minutes.
- While the dough rests in the fridge, prepare a lightly floured surface to begin the lamination of the dough.
- 1st fold: After five minutes in the refrigerator, remove from the fridge. Next, start rolling out your dough into a rectangle that is 6-7 inches wide and 15- 16 inches long. When rolling out the dough, try to keep it in a rectangle shape and keep the thickness even by using a dough knife to push the ends into sides to make them more rectangular. Then keep rolling out the dough from the thickest end out to the thinner end to keep the thickness of the dough even. Once it is rolled out, mentally measure out the thirds of the dough vertically. Then get one of the 100g bags of butter out of the freezer and spread it evenly on the bottom ⅔. Try to cover as much of the dough as possible with the butter. Also, break up any chunks of butter before placing it on the dough. The next part is the folding of the dough. Take the ⅓ with no butter and fold it onto the middle of the dough. Then fold the bottom with the butter onto the middle of the dough, covering the last fold. So, it forms a small rectangle. Temperature is key to making puff pastry, so if the butter starts getting warm and starts pushing through the dough, then put it in the freezer for 10 minutes.
- 2nd fold: Turn the dough 90 degrees. Then roll out the dough again to the same size as before in a rectangular shape. Then spread the last 100g of butter onto ⅔ of the dough. After that, fold the dough without butter onto the middle, followed by the one with butter just as you did with the first fold.
- 3rd fold: This fold is the first with no more added butter. So, turn the dough 90 degrees and roll the dough out to the same rectangle shape and size. Then fold the top ⅓ of the dough onto the middle and the bottom 1/3 onto the middle. At this point, you might need to put it in the freezer for ten minutes to cool down.
- 4th fold: Turn the dough 90 degrees and roll the dough out to the same rectangle shape and size. Then fold the top ⅓ of the dough onto the middle and fold the bottom 1/3 onto the middle. Put the dough in the freezer if the butter is too soft and comes through the dough.
- Fold 5: Turn the dough 90 degrees and roll the dough out to the same rectangle shape 6-7 by 15-16. Then fold the top ⅓ of the dough onto the middle and fold the bottom 1/3 onto the middle.
- After the fifth fold, wrap the dough in plastic wrap and place it in the fridge for at least 2 hours or overnight. For best results, leave it in the refrigerator overnight. If you do not want to use it quickly, cut it in half and place it in the freezer.
- To use: You can use it right from the fridge or give it another fold. Then roll out to use for your pastry.
- To use if frozen: Take it out of the freezer and let it rest until it is soft enough to roll out. Then roll it out and use it.
Notes
This recipe is adapted from The Flavor Blender Blog.